There are tons of tutorials on the internet that will teach you how to place an image inside text in PowerPoint. Sadly, most of these tutorials opt for the most comfortable method, which usually leads to a hideous slide.
Setting Up
To get things going, you’re going to have to do two things: get some text on your slide, and choose a picture that you want to go in it.
For our tutorial, I’ve written “Smile” on the slide, set the font size to 240, and chose a bulky font to go with it.

The picture I’ve chosen is a woman holding a sticky note with a smile drawn on it.

Yes, this picture a stock photo, and I think it fits the theme I’m going for.
By the way, if you’re looking for free stock images that are gorgeous, then check out this post which highlights four resources that you can use. Make sure that the image you’ve chosen follows the BARE principle.
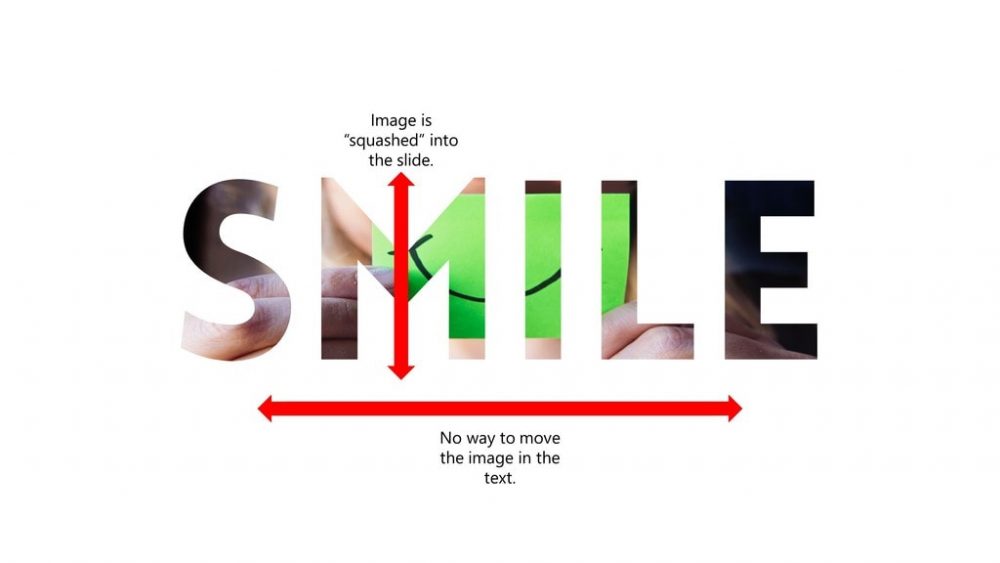
The Wrong Way to Fill Your Text with a Picture in PowerPoint
What most would do is right-click the text box on the slide, click Format Shape, and then, under Text Options, click Picture or Texture Fill. From there, a picture can be selected and automatically placed into the text without issues.
Don’t do this.
Indeed, you can get a picture into your text in under 10 seconds, but your slide will end up looking like garbage since the picture’s resolution will also be distorted. Furthermore, you won’t be able to position the image inside your text under any circumstances. What you see is what you get, and that can be daunting.
Correctly Placing an Image into Your PowerPoint Text
To do this correctly (and consequentially, beautifully) you’re going to have to be innovative with PowerPoint’s features.
1. Cover Your Slide With a Rectangle
Go to the Insert tab, then click on Shapes and select a rectangle. Cover your entire slide with that rectangle. You also want to make sure you remove the outlines of that rectangle.
When you’re done, right click on the rectangle and click Send to Back.

2. Subtract the Rectangle with the TextBox
Hold the control key, and then click on the rectangle shape first, then the text box second. With both elements highlights, go to Format tab and click on Merge Shapes > Subtract. You’ll end up with something that looks like this.

3. Bring in and Position Your Image
This step is self-explanatory: select any image you’d like and bring it into your PowerPoint slide. Right-click it, and click on Send to Back. You can then move the image around and position it wherever you’d like.
Once you’re happy with the size and position of your image, click on the rectangle and change its color to whatever you’d like. I chose white for mine since I wanted it to match my slide’s background.

4. (Optional) Spice it Up
Why stop here? You can play around with your slide and add some creative flair to it. For instance, I’ve added a color gradient to mine just to give it some feel-good vibes, similiar to the section break tutorial I posted recently.

This is a Creative Solution (That Works Perfectly)
Like I said in the video, the whole idea of this is to make sure you have the chance to manipulate your image in any way that you would want to. It’s your slide after all!
If you have any comments or questions, please drop a line below.

Great technique! Another way to add spice is to add a shadow or bevel effect to the shape. It looks like the effect is added to the text. Make the shape slightly bigger than the slide so that the effect on the outer edges doesn’t show.
Great tip, Ellen!
Love this! Thank you for the tutorials 🙂
hey Yoyo! Can’t do so using 2010 version pf powerpoint. Text and shape dont subtract. Anything I coud do?
Hi Divya,
Unfortunately, no :(. Do consider investing in Office 365. It’s worth it! Trust me!
I don’t have the merge shape option
I think you’ll need to upgrade your PowerPoint software.
This is exactly what I needed, thank you so much!!!!! Wish I came across this sooner!
This is fantastic, I love it when I can do Photoshop stuffs on Powerpoint! Thanks for this!
Thank you so so much for this!!!!
How would you add a circle around the words? with the same picture used to fill the circle